Choose the Best Soldering Iron For Stained Glass
[modalsurvey id=”392925031″ style=”flat”]Customer’s Choice: the Best Rated Soldering Irons For Stained Glass
[survey_answers id=”392925031″ style=”plain” data=”score”] users answered this survey. Please help us improve this review!
[survey_answers id=”392925031″ style=”piechart” legend=”true”]
Many people do not realize stained glass seams are actually made of solder. Artists use copper foil, lead came, and flux to assemble intricate, eye-catching glass designs. A soldering iron is a tool that pulls all these elements together. A well-made soldering iron must be able to convert hard solder into a molten liquid. To achieve the best results, the iron must maintain a steady and high temperature. What’s more, the iron must be easy to hold and manipulate. It’s not easy to solder stained glass! A proper soldering iron can make the job easier and more enjoyable. We’ve scoured the market in search of the top soldering irons for stained glass crafts. In the section below, you’ll find our top five picks along with a few essential buying tips.
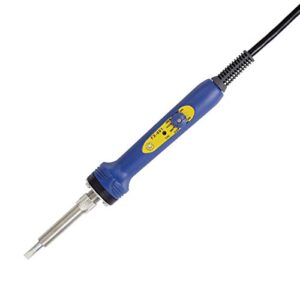
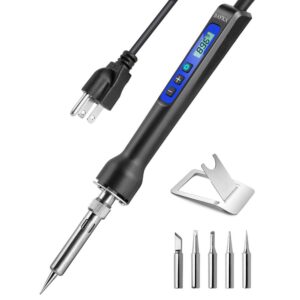
Hakko FX601-02 – Customer Favorite
The Hakko FX601-02 heats up rapidly and maintains a consistent temperature. The Hakko’s lightweight body makes it a comfortable choice for extended applications. The device’s 67-watt heating element provides accurate and unrelenting heat.
It is made from durable ceramic elements. An onboard dial enables users to adjust the temperature at any time. A bright pilot light lets users know when it is on and ready. Finally, a strain-resistant cord prevents the iron from coming loose during enhanced maneuvers.
It’s worth it to spend a little more for a model like the Hakko. Stained glass specialists have agreed that this Hakko iron is well-deserving of praise. It features a long, ergonomic handle for more comfortable soldering sessions. The controls are easy to access and offer precise temperature settings. The device turns on quickly and maintains its temperature.
The only downside of this model is that the handle gets warm. Nevertheless, we are confident that a rubber grip would remedy the issue. We are willing to look past this minor issue. After all, this is one of the few irons that can maintain its temperature alongside a wet sponge. What’s more, it has an incredible reach and ergonomic body.
Pros
- A closed-loop temperature control with adjustment dials
- Turn dialn for easy wattage adjustments
- Ergonomic stick handle
- Strain-resistant cord
- Lightweight
Cons
- Expensive
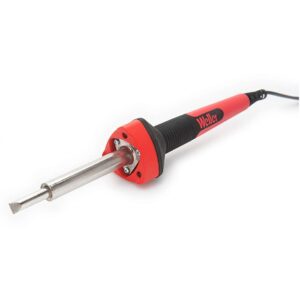
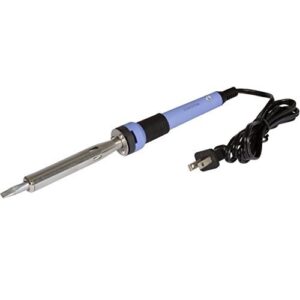
Weller SP40NKUS – Best Budget Option
The Weller SP40NKUS is a budget-friendly iron that’s ideal for stained glass applications. The Weller protrudes from a triangular housing. This shape makes it easier to grip and control the device for extended work sessions.
The housing also serves as an excellent foundation for the iron’s three LED lights. The Weller SP40NKUS heats up rapidly and maintains a temperature above 900 degrees.
The products rounded, ribbed grip gives users unmatched comfort and flexibility. You can easily roll the device in your hands for easier access to corners and crevices. The device’s housing and LEDs are heat resistant. As such, they will last a lifetime. The tips are susceptible to wear. However, the kit comes with a set of durable replacements. The tips can be switched out when it is time to install a replacement.
The Weller iron weighs a mere 6.9 ounces. It is 9 1/10 inches long and 1 1/2 inches wide. The iron’s black and red housing makes for a clean, noteworthy exterior. This iron reaches its target temperature within minutes. Not to mention, it maintains a consistently high temperature. Unfortunately, it does not boast a temperature dial. The product does come with a 6-millimeter tip, iron stand, soldering aid, and spool of solder. It also comes with 3.2-millimeter and 0.8-millimeter tip replacements.
Don’t let this iron’s limited wattage deter you from its potential. It comes with a 5-foot power cord and nearly a decade-long warranty. Weller is one of the country’s top soldering iron manufacturers. They have been producing irons and other soldering products since 1945.
Pros
- Three LED lights for workspace illumination
- Comes with a set of spare tips
- Includes extra wire and soldering aid
- Molded, ribbed grip
- 40 watts of power
- Lightweight
- 7-year warranty
Cons
- Short cord
- Temperature is not variable
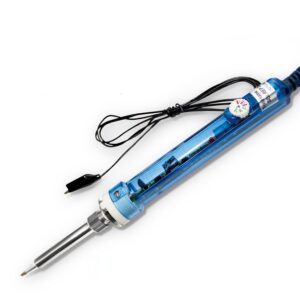
TasiHome Soldering Iron – Best Anti-Static Connection
The TasiHome Soldering Iron offers 60-watts of reliable and consistent soldering power. This device features a transparent blue housing and a static-resistant cord and clip. It also comes with a set of three unique soldering tips for more precise stained glass applications.
More tips can be purchased online. The tips are easy to remove and replace.
We love that the TasiHome iron gives users full control of its temperature output. It boasts an onboard dial that controls a loop-based heating system. As such, the settings only falter a degree or two from the registered settings. This device takes minutes to heat up. What’s more, it maintains its temperature for extended periods. You can easily get through long-lasting stainless glass soldering jobs without having to cope with fluctuating temperatures. A red power indicator light lets you know when the device is ready to go.
This is a robust iron that will carry you through a wide range of applications. The iron offers enough heat for uniform stained glass seams. It is also a great tool for soldering small electronics and jewelry. The manufacturer guarantees the TasiHome iron for the long haul, offering a guarenteed refund with each purchase.
Pros
- 60-watt heating element
- Onboard temperature dial
- Only 2 degrees of temperature deviation
- Adjustable temperature
- Comes with three soldering tips
- Red power indicator light
- Anti-static power cord with clip
- Melting point lower than 842 degrees
Cons
- Additional tips sold separately
- No on/off switch
Bayka Soldering Iron – Best LCD Display
The Bayka soldering iron offers a complete LCD temperature display along with a powerful heating element. The Bayka is a traditional pen iron with an ergonomic grip and long, slender housing. It features an adjustable temperature that ranges from 482 to 986 degrees Fahrenheit.
We love that this device features a push-button on/off switch as well as nine preset temperatures. It can achieve its max temperature (896 degrees) within 30 seconds. Users can make 1-degree adjustments with the help of onboard plus and minus buttons. The LCD screen offers accurate temperature readings.
The Bayka iron features a flame-retardant nylon housing, a metal iron, and a ceramic heater. It also boasts an auto-sleep function that prevents it from overheating. The product comes with a set of five distinct soldering tips and a metal soldering stand. Each iron is backed by a generous replacement policy, a 2-year product warranty, and a lifetime of customer support.
We recommend this iron for everything from glass-based crafts to small electronic repairs. The Bayka makes it easy to switch between different temperatures and types of solder. Our only complaint is that the power cord is very rigid. As such, it is difficult make one-handed maneuvers. We recommend pairing it with a quality extension cord. This simple amendment will give you ample flexibility and freedom.
Pros
- On/off switch
- Automatic sleep setting
- LCD temperature setting display
- Comes with five pre-tinned tips
- Nine preset temperature settings
- Temperature range from o to 896 degrees
- Heat-resistant case made from metal and flame-retardant nylon
- Ceramic heater
- 30-day return and replacement policy
Cons
- Only two control buttons for all settings
Choice Soldering Iron – Editor’s Choice
The Choice iron is a workhorse that’s ideal for extended stained glass projects. This tool features a durable aluminum housing with a rubber grip and an extended power cord. It offers 100 watts, 120 volts, and over 1,000 degrees of power.
While the Choice iron does not feature a temperature dial, it is compatible with most aftermarket options.
This iron is a favorite among stained glass artists and other hobbyists. The lightweight body and pen-shaped handle make it easy to operate for long periods. The device comes with a standard chisel tip. Replacements are hard to find. However, high heat and precision tips work perfectly alongside copper foil.
The Choice iron measures 10 1/2 inches long and 1 inch in diameter. Unfortunately, there is no power indicator light on the body. Still, you can count on the Choice to heat up fast and maintain its temperature. We recommend pairing it with a well-rated thermostat and heat-resistant extension cord.
Pros
- 120-volts (100 watts) of power
- 1/4-inch chisel tip
- 1,000 degree temperature limit
- Made of aluminum
- Lightweight (4.8 ounces)
Cons
- Replacement tips are not readily available
- Requires holder (sold separately)
What to Look for in a Soldering Iron for Stained Glass
A mosaic of colorful glass would be nothing without durable soldered seams. We asked several stained glass specialists what they looked for in a soldering iron. Then we honed in on the elements that defined their top picks.
Watts
Each soldering iron features a set wattage. A stainless glass soldering iron may offer anywhere from 40 to 200 watts of power. Low-watt irons offer less power. They are more suitable for light applications. High-watt soldering irons offer more consistent and intense power.
Temperature Controls
Traditional stained glass solder melts between 360 and 370 degrees Fahrenheit. With that said, temperatures tend to fluctuate during soldering applications.
It’s best to opt for a medium to high-powered soldering iron with a built-in temperature regulator. Closed-loop soldering irons regulate the temperature through the entire soldering process. These systems are often typically paired with a temperature dial, such as an analog dial or digital temperature control. Make sure that your iron’s settings are within a few degrees of accuracy.
Heating Element
Most soldering irons feature metal wire or ceramic heating elements. For the most part, ceramic elements heat up faster and maintain more consistent temperatures. Nevertheless, metal wire elements are better for longer, more involved applications.
Ergonomics
Stained glass soldering irons should have lightweight bodies with slip-resistant grips. Stained glass soldering is a long, tedious task. A simple rounded handle can be tiring. We prefer to use a pencil-style soldering iron with an ergonomic rubber coating. It helps if the pen has a housing that suspends the tip in the air. Otherwise, you will need a soldering iron stand.
Tips and Extra Accessories
Most people use a simple chisel tip when soldering stainless glass seams. Look for a soldering iron that comes with a few versatile replacements. Make sure that the tips are easy to remove. What’s more, double-check to ensure the replacements are readily available.
You will also need a few accessories before you can begin soldering. Some irons come with cleaning sponges, brass coils, solder, and stands. It pays to find a package that includes all the essentials.
Video Tutorial: Choice soldering iron for stained glass
FAQ: Soldering Irons For Stained Glass
Can you use any soldering iron for stained glass?
You don’t want to use any old soldering iron for stained glass. Stained glass requires heightened precision. For most small scale stained glass projects, a soldering iron with a reliable ceramic heating unit will work fine. Ceramic soldering irons heat up quickly and maintain their target temperature for extended periods. Electric wire soldering irons are only used for industrial-scale projects.
Opt for a soldering iron with an adjustable temperature range. An accurate onboard temperature dial allows you to safely switch between copper foil- and lead-based stained glass projects. What’s more, ensure that your iron has an ergonomic grip that can be used comfortably at all angles.
What kind of solder is used for stained glass?
Not all solder are well-suited for stained glass. The most popular and easiest to work with solder for stained glass seams is 60-40 solder, which contains 60% tin and 40% lead. This type of solder is ideal for copper foil and lead came seams. You can also utilize 50-50 solder, which consists of 50% tin and 50% lead. The 50-50 solder is usually used on Inox treatments and lamp seams. Keep in mind that 50-50 solder produces a less bulbous bead than 60-40 solder. Since 50-50 solder doesn’t flow as easily as 60-40 solder, it is not the best selection for beginners.
Always opt for solid-core solder for stained glass seams. Moreover, make sure your solder has a diameter between 0.062 and 0.125 inches. One-pound spools are ideal for stained glass work, as they are easy to manipulate with one hand.
How do you fix soldered stained glass?
Glass breaks sometimes. When it does, you need to remove the existing solder line and broken glass shards to clear the way for the replacement pieces. First, you’ll need to cut and grind your replacement glass to ensure it is a perfect fit for the damaged section of your stained glass panel. Remember, it is better to make the replacement glass slightly smaller the void it is intended to fill.
You can do this by laying a piece of replacement glass over the area you need to replace. Use a felt-tipped marker to create a stencil of the broken glass piece on the replacement glass. Then, move a conventional glass cutter along the lines to score the glass. Once the glass is scored, you should be able to break the replacement piece away from the glass base. If necessary, make additional cuts. Then, double-check the replacement piece to ensure that it fits. You can also use your original glass stencil if you still have it.
After that, run your soldering iron over the bead that surrounds the broken glass. You’ll need to remove the solder from both sides of the stained glass. Once the majority of the solder has melted away, use grozing pliers (breakers) to peel away any remaining foil and solder. Use a glass cutter to score the remaining shards of glass. Then, use the ball end of the glass cutter to break off pieces. Once some of the pieces have fallen from the stained glass. Use metal pliers, or breakers, to remove any remaining shards of glass.
Next, prepare the replacement piece. Wrap the edge of the glass in foil. Run your hands over it to ensure that it is flush with the surface of the glass. Carefully align the replacement piece with the void in the original stained glass piece. Then, brush the border with flux.
Use your soldering iron and solder to replace the bead on one side. Once the solder has cooled, flip it over. Then, apply a bead on the opposite side. Congratulations! You’ve successfully repaired your stained glass! Are you still confused? Check out this helpful how-to video.
If you are looking for a quick pick, check out the Hakko FX601-02. This impressive soldering iron boasts a powerful ceramic heating unit and an onboard temperature dial, making it an excellent pick for stained glass applications.
What is the best temperature to solder stained glass?
When soldering stained glass, you’ll want to set your iron to approximately 700 degrees Fahrenheit. Solder turns to liquid at approximately 700 degrees. Your iron must maintain a consistent temperature at all times. Otherwise, you may experience cold spots.
Keep in mind that 60-40 solder melts at a slightly lower temperature than 50-50 solder. It is essential that you to closely monitor the temperature of your soldering iron, as excess temperatures could cause the glass to shatter.
Can I use rosin-core solder for stained glass?
You should never use rosin-core solder for stained glass. Rosin-core solder is highly acidic. Stay away from this messy solder. Instead, use solid-core solder with paste flux.
How do you remove oxidation from stained glass?
The copper foil and lead lines in stained glass sometimes become oxidized. You can remove the unsightly oxidation using a simple mixture of white vinegar and salt. You can also use a powder silver cleaner. Use a clean cotton cloth or nylon brush to apply your polish to the oxidized lines.
Use your cloth to gently scrub the metal seams. Do this to both sides of the panel. When you are finished, dip your brush or rag into water. This dilutes the cleaner, revealing areas that may need additional attention. It doesn’t take long to renew stained glass creations. All you need is some simple supplies and elbow grease.
How do you attach jump rings to stained glass?
You can easily attach jump rings to your stained glass panels. First off, check to make sure your capping came is longer on the vertical sides of your piece. By doing this, you create small holes in the top corners of your panels. Coat your jump rings in a thin layer of solder. The process is called tinning. Then, place the rings into the small holes on each side of the panel. Coat the rings and came with flux. Then, place a small bead of solder inside both of the jump rings. Continue to apply solder until the holes are filled. We recommend using small solder scraps rather than melting it straight from a spool.
If the came on your project does not have holes in it, you will have to solder horseshoe-shaped rings to the outside of the frame. You can make homemade jump ring hooks or purchase manufactured jump rings and or hangers.
Final Thoughts
There you are! You are now ready to shop around for the best stained glass soldering iron. There are plenty of amazing tools on the market. Use our buying guide to make the best possible purchase! A well-made soldering iron will provide you with years of quality soldering projects. Just think of all of the stained glass you can produce with a vetted iron and an ample supply of colored glass!
Do you have a favorite stained glass soldering iron? Let us know in the comment section below!

Never used an electric iron for stained glass… we were taught with gas soldering irons, and they get nice and hot. True, they don’t have a thermostat, buy your hand and forearm become ”attuned” for when the iron is getting too hot so ‘came melt’ is likely. Gas is low maintenance, just replace the orange rubber tube every so often when needed (the gas corrodes the inside of the rubber)… it is sad that so many now use electric irons, as gas soldering is very meditative..the ‘living flame” is very sensitive to adjustment too.
Hello, Alex! Thanks for sharing your experience.
If you are looking for the best solder for stained glass, the market offers many good options these days. Solder is widely used in stained glass projects. My favorite is lead-free solder by Kester.