Why tin a soldering iron tip?
During the soldering process, there is a need to take solder (an alloy of lead and tin) with a heated tip, which is transferred to the joint. But if you do not tin it, then this procedure becomes impossible. The solder does not stick to a soldering iron, respectively, it is impossible to take the right amount of alloy and transfer it to the place of soldering.
Why does it happen? When there is a contact of the heated tip with the solder, this solder melts and adheres to the surface. There is also a layer of tin on it – called a “tin-plated soldering iron”. But if the tip is stained with rosin, flux or plastic, this interaction stops working. The solder simply melts, droplets of metal form, but this tip does not stick as it should be.
A properly tinned soldering iron is a tool when the working part is covered with a thin layer of solder. Tin readily sticks to such a surface, and it can be easily transferred to a conductor, circuit boards, electric components, etc.
Materials for tinning a soldering iron
To properly tin a soldering iron with a copper tip, you need such materials and tools:
- pine rosin;
- solder;
- sandpaper;
- any sponge;
The result will be much better if you follow my recommendations – the experience of 10 years is what I can offer at this point:
- Do not use a resin that has expired. It is better not to take the darkened and contaminated resin with foreign substances. As a rule, standard rosin is suitable for use within two years after it was manufactured;
- A solder is recommended to buy one that has the lightest shade. This means that the alloy has more tin, and, respectively, less lead. Such solder melts better and it is easier for a novice user to handle;
- The sandpaper should be taken to result in no deep furrows left on the copper tip. For the same reason, never use grindstones for tinning the tips. Excellent results are obtained with the use of sandpaper with P150 grit;
- The sponge for washing dishes must have a hard pad since this side is used in the work. You can replace it with almost any materials. There are also special sponges for cleaning the soldering iron tip;
- Fireproof soldering iron tips require a delicate attitude. Never clean them with sandpaper, since their protective layer is quite thin. And the damage will lead to early burnout and wear of the tip. Such tips must be occasionally wiped with a special sponge (check the soldering accessories) or on a wet piece of cloth;
- Instead of a special sponge, a dishwashing sponge is quite suitable. Naturally, the sponge should be moistened with water. You can moisten the sponge with glycerin (sold in all pharmacies), then the sponge will not dry, it always remains wet and ready to work;
- To clean a non-combustible tip, you will need to use special tip cleaners. It resembles a washcloth made of brass chips in the shape of a ball. From time to time, a person must immerse the tip into this mesh ball. In this case, the excessive solder and oxides from the tip remain inside the ball;
How to tin a soldering iron tip made of copper?
The following method can tin soldering irons only with a copper tip. If you sandpaper the ceramic tip, then it will irretrievably lose its properties, and the expensive nozzle will only have to be discarded.
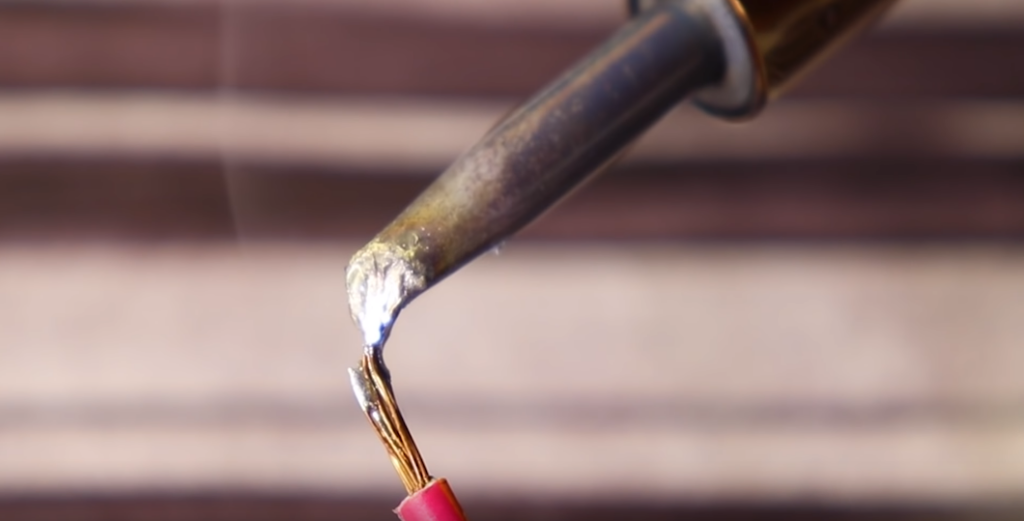
If the solidified tin remains on the working surface of the tip, then it can be removed as I recommend below. The soldering iron must be heated at first. Then the tip is lowered into the rosin. It is cleaned on a stranded copper wire soaked in flux.
Next, the working part of the tool must be cleaned off soot with sandpaper. Copper is a fairly soft metal so do not grind too much.
Immediately after cleaning the whole instrument, the soldering iron is plugged in and warmed up to the working temperature. Since copper oxidizes very quickly, it’s recommended to lower the tip into rosin during the heating process. Such action will limit the access of oxygen, and the surface is not covered with oxide in a matter of seconds. At high temperatures, this process accelerates significantly.
When the soldering iron is properly warmed up, it is removed from the rosin and brought to the solder. After collecting a sufficient amount of alloy (tin should adhere perfectly to the cleaned surface), the copper tip needs to be again immersed in rosin for a few times. Due to the large surface tension, the tin will evenly disperse along the working surface of the soldering iron.
You can improve the result using the cardboard pre-coated with rosin. If you move the tip with solder on such a surface, the tin will be better distributed and will lie in a thinner layer.
Next, you need to clean the soldering iron from the excessive molten metal. You need to tin a tip with a wet sponge a few times. At this point, you should be careful not to use a dirty tool again. Immediately after cleaning, the tip is lowered into the rosin to protect the applied coating.
The result of the above procedure should be a perfectly tinned soldering iron with the thinnest tin layer on the working surface of the tip. If everything is done correctly, then the subsequent soldering process will be simple even for a novice user.
The fastest way of tinning a soldering iron tip
I recommend taking sandpaper and applying it to the very tip of the soldering iron. Now you need to sharpen in the same motion, from time to time by checking the tip, until it becomes flat, smooth and shiny.
Immerse the heated tip into rosin and immediately into the solder (into the tin). There will be almost no sticking solder to the tip, so immediately after this procedure I apply the tip to a small board, preferably made of natural origin (not chipboard). It is better than spruce or cedar (tar).
Then repeat the process (rosin → solder → board) until the yellow-colored section of the tip prepared with sandpaper with a bluish overflow of heated copper becomes silvery and shiny from the solder covering it evenly. This process is called “tinning” of a soldering iron tip.
Recommendations for tinning a soldering iron tip
To boost the process of soldering metal parts, you must adhere to some rules and follow the advice of soldering experts. The main thing is the workplace: it must be provided with a secure outlet. The necessary materials must be arranged in such a way that it is convenient to do all the actions. You should also take care of proper lighting in the workplace.
Half the success of soldering depends on how to tin the soldering iron tip, so pay attention to this process and do not hurry during the process.
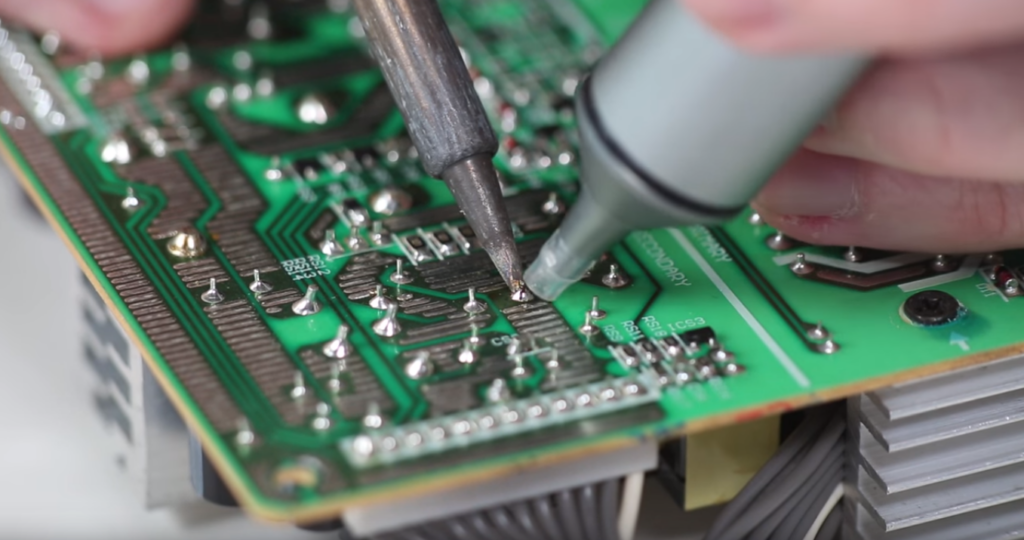
But this process can be significantly boosted with the help of solder paste or other chemical composition (flux), which can be purchased in specialized or construction stores.
By means of tools, you can work not only with soft metals but also with iron, steel or zinc. If the soldering iron is used regularly, then the tip will always be in working condition, you can gently tap the base with a hammer after removing it. The iron must have a removable tip. You can make the soldering process more convenient and accurate.
Final thoughts
Tinning a soldering iron tip is a simple thing to do if you do it on a schedule. Rare tinning won’t help your device to serve longer. Therefore, I would recommend tinning as soon as you start noticing the worse state of the soldering iron tip. Make sure to use the proper materials for this process to save your device from the damage.
I never knew how to tin a soldering iron before – thanks!
Hello, Hank! Thanks for the comment.
Now I know how to tin a soldering iron. But if you don’t, then this procedure becomes impossible. The solder does not stick to the soldering iron and it is impossible to take the right amount of alloy and transfer it to the place of soldering.